October 22, 2019
Gatsby and Sanity.io CMS Tutorial
gatsbynetlifycmssanitytutorialJAMstackA step-by-step tutorial on adding Sanity.io to your Gatsby site.
This tutorial will require basic knowledge of Gatsby (and therefore React).
Why Sanity.io?
There are so many CMS's to choose from when designing your Gatsby site and they all have their strengths and weaknesses. One option is covered in my Gatsby and Netlify CMS tutorial. However, I was keen to find something a little more 'developed', with a few more interesting capabilities. As always, I like to try out free content management systems or those with a generous free tier. After a fair bit of trawling the internet I came across Sanity.io.
It requires some setup but it offers a very easy-to-use studio for making your content changes. There are tons of customisation options and its super simple to reference other fields, something I found a bit lacking in other CMS's. The free tier includes up to 3 users and 2 datasets which is great if you're making a small site but still want to be able to add another user.
What you will need:
-
A Gatsby project. You can use an existing project or use a Gatsby starter. I'm going to be using the default gatsby starter for this tutorial.
-
A GitHub account.
-
A Sanity account. You can login with Github or use an email address.
Setting up our Sanity content studio
For this tutorial I am going to make a very simple, one page blog. The content for the blog posts and parts of the about me page will be stored in Sanity. The blog posts are repeatable content (you can just keep making more of them).
So with that in mind, let's get on with setting up our studio! The first thing to know about Sanity is that we will have a whole folder of project files that is separate from our Gatsby site project files. I will be using the following file structure locally to store these:
sanity-gatsby-tutorial
|
├── sanity-studio
|       └── ...project files
├── gatsby-sanity-site
|       └── ...project files
So first, make that parent folder sanity-gatsby-tutorial somewhere. You can of course call it whatever you like!
Now, the easiest way to setup a Sanity project is to use their command line tool. To do this we must first install the cli:
npm install -g @sanity/cliThen we can initialise a project. Make sure you are inside the new parent folder when you write this command!
sanity initYou will then receive some nice, clear instructions via the command line! Follow these. I'm going to take you through the steps here because hand holding is nice when you're coding.
-
First you will be asked to login to your sanity account. Select your chosen login method. Mine is GitHub so when I use the arrow keys and enter to select this a new web window opens up to authorise me. This may happen automatically if you're already logged in!
-
Once logged in you can either select an existing project (if you have any) or make a new one. We're going to select 'Create new project'.
-
Now we are asked to provide a name for our project. It's always nice to be explicit. So I'm going with
sanity-gatsby-tutorial(a.k.a. the name of my parent folder). -
Now we can choose if the content will be public or private. For most projects public is fine (you will still have to login to make any changes to the content of course!) It asks if you want to use the default public configuration so we're gonna say yes with a
Y. -
Then you'll be asked for the project output path. It'll show you where you're sitting right now which should be inside the parent folder we created. So we're just going to type the name of the subfolder that we want to store the sanity configuration files in. Based on my file structure diagram at the start of this tutorial I'm going with
sanity-studio. -
Almost there! Finally our helpful sanity cli friend asks if we'd like to use some prebuilt schemas to make our life easier. These are great and I recommend having a play with them but we're going to go for the 'Clean project with no predefined schemas' option as I think this is the best way to learn how stuff works.
Hooray we have a project! Let's open it up and have a look.
Creating a blog schema.
You'll see that there is a folder called schemas. This is mainly where we will be working to get our CMS all set up. This folder contains a file called schema.js. By editing the code in this file we create our content structure. We can put all our different schemas in this one file if we like. But that can get out of hand real quick. So for the sake of tidy code (and therefore, tidy mind) we're going to create a file per schema and import them all into this schema.js file.
To make a schema for our blog post we will first create a file called post.js in this folder. Each schema describes one item in a database. So we use the singular 'post' when naming instead of 'posts'. This isn't essential but it makes it easier to keep track.
Our schema is an object that we will export (so that we can import it into the overall file as described above).
Add the following code to your new file:
// in post.js

export default {
    title: 'Blog Post',
    name: 'post',
    type: 'document',
    fields: []
}- The title is the displayed name in the content studio. It's what the content editor will see.
- The name is the identifier for this item used in the API.
- The type should be 'document' for now.
- The fields array is where we add the different fields that we want a blog post to contain. e.g. a title, a body, a date etc.
Fields
Each field is an object in the array. To keep things simple we're going to give each field four properties: title, name, type and validation.
First, create a title field for the blog post:
// in post.js

export default {
    title: 'Blog Post',
    name: 'post',
    type: 'document',
    fields: [
        {            title: 'Title',            name: 'title',            type: 'string',            validation: Rule => Rule.required()        }    ]
}
Pretty logical really!
Let's add a date field and a description field:
// in post.js

export default {
    title: 'Blog Post',
    name: 'post',
    type: 'document',
    fields: [
        {
            title: 'Title',
            name: 'title',
            type: 'string',
            validation: Rule => Rule.required()
        },
        {            title: 'Date',            name: 'date',            type: 'datetime',            validation: Rule => Rule.required()        },        {            title: 'Description',            name: 'description',            type: 'string',            validation: Rule => Rule.required()        },    ]
}
Notice the type for the date is datetime. You can read more about the types available in Sanity here.
You may notice that we are missing a field for the actual post body. This is because we will need to do some extra work to get this working as a rich text field. For now, we will see if we can get the basic fields working in our studio.
Save the post.js file and then go back into the schema.js file and import it. See the highlighted lines below for how to import it. The rest of this code (including the comments) should already be in this file from when it was generated by Sanity.
// in schema.js

// First, we must import the schema creator
import createSchema from 'part:@sanity/base/schema-creator'

// Then import schema types from any plugins that might expose them
import schemaTypes from 'all:part:@sanity/base/schema-type'
import post from './post'
// Then we give our schema to the builder and provide the result to Sanity
export default createSchema({
  // We name our schema
  name: 'default',
  // Then proceed to concatenate our document type
  // to the ones provided by any plugins that are installed
  types: schemaTypes.concat([
    /* Your types here! */
    post  ])
})
To create the CMS studio locally we need to go back to our command line. Make sure you are in the correct location (in my case sanity-gatsby-tutorial/sanity-studio) and then run the following command:
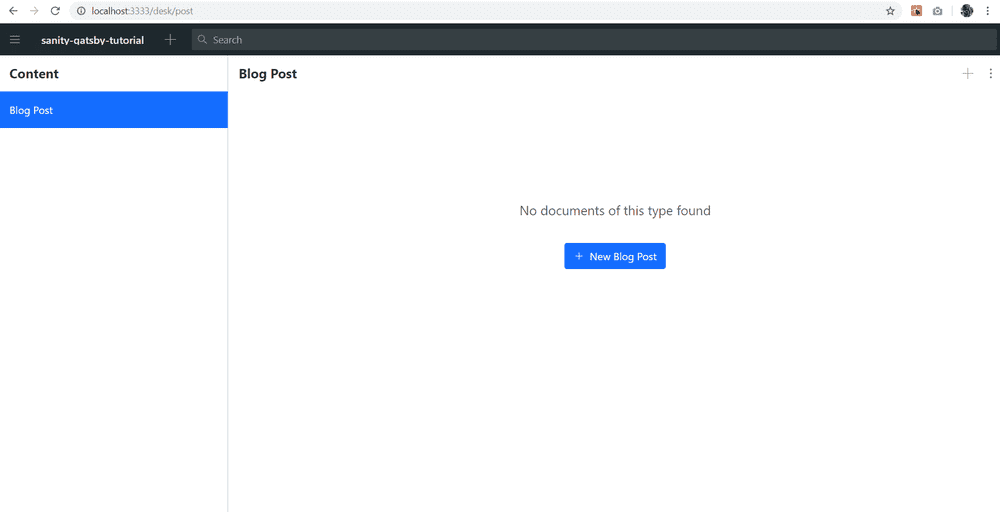
sanity startOnce it has successfully compiled it will tell you to go to localhost:3333.
And there you have it - your studio! You will see the Blog Post under Content. Click it and try creating a new blog post!
Adding a Portable Text / Rich Text field
The actual content of our blog needs to use a field that allows formatting. This includes bold, italics, headings, line breaks, links, images etc.
Sanity uses Portable Text for this purpose. Have a look at the repo for Portable Text if you're interested in reading about how it works.
The TLDR version is this allows you to add all sorts of custom things to the editor that most rich text editors don't have. It's very customisable and therefore, awesome. I may do a future blog post about customising your Portable Text field but for now let's keep it super simple with some basic formatting and an image option.
Add the following to the post.js schema:
// in post.js

export default {
    title: 'Blog Post',
    name: 'post',
    type: 'document',
    fields: [
        {
            title: 'Title',
            name: 'title',
            type: 'string',
            validation: Rule => Rule.required()
        },
        {
            title: 'Date',
            name: 'date',
            type: 'datetime',
            validation: Rule => Rule.required()
        },
        {
            title: 'Description',
            name: 'description',
            type: 'string',
            validation: Rule => Rule.required()
        },
        {            title: 'Content',            name: 'content',            type: 'array',            of: [                    {                        type: 'block'                    },                    {                        type: 'image'                    }                ]        }    ]
}
This basically says that we want a new field that will be an array of blocks and images. Blocks are a specific type for rich text and encompass all the basic formatting. Image we add as an extra.
Save your changes and take a look at the studio again which should update automatically. Look at that lovely rich text field!
Deploying the studio
Now that our Sanity setup is done we are ready to put the content into a Gatsby site! But first, we must deploy the CMS. Up to this point we've just been looking at it locally but in order to pull in the data we need it to be hosted somewhere. Fortunately, Sanity will do this for us!
Before we do this, now is a good time to get the studio pushed up to a repo in Github.
Once that is done go onto the command line, into the right folder and run this command:
sanity deployYou will be asked for a name for the url to the studio. The studio will be available at <your-project>.sanity.studio so choose wisely.
We should also deploy the GraphQL API while we're at it. Gatsby uses graphQL to query data and in order to use this with Sanity we have to actively deploy an API for our dataset. Bear in mind that you need to do this every time you change the schemas. This is the command you will need to type on the command line:
sanity graphql deployThe Gatsby site
Okay, now to get the Gatsby site sorted! You can use an existing Gatsby site or start from a blank slate. I'm going to use the default Gatsby starter for this tutorial.
First we need to hook our new website up with our Sanity content. Navigate into the website folder and install this source plugin:
npm install --save gatsby-source-sanityOnce it has installed, add this code to your gatsby-config.js file:
// in gatsby-config.js

module.exports = {
  plugins: [
      // ... other plugins
      {
      resolve: 'gatsby-source-sanity',
      options: {
        projectId: 'YOUR-PROJECT-ID',
        dataset: 'production',
        watchMode: true,
      },
    },
      // ... other plugins
      ],
}
You can find your projectId if you login to your sanity account online. If you used the default setup your dataset will be called 'production'. This can also be found in your account if you're unsure. Setting watchMode: true gives us live updates when the Sanity content changes locally. This is one of the awesome features of Sanity!
Querying the data
This is what the homepage on the default starter that I'm using looks like:
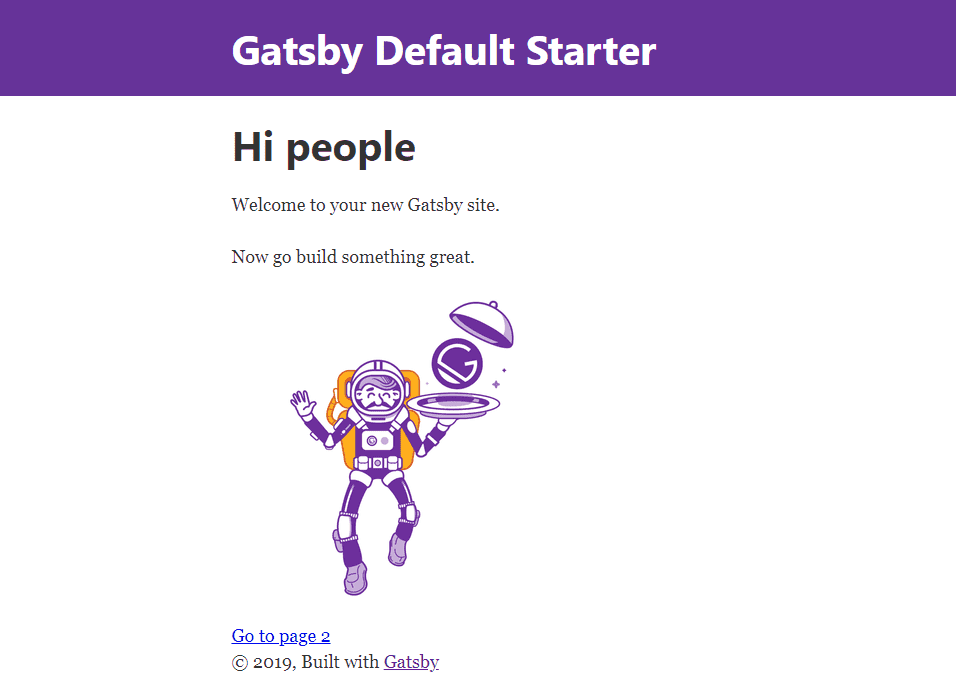
I'm going to remove most of this existing content so that we can have a list of blog posts on this page.
To do this we're going to need to query the blog posts!
As always, I recommend opening up GraphiQL at http://localhost:8000/___graphql and having an explore. The structure of the query always depends a little on the source plugin used so it's always worth having a play before you try to write any queries!
This query will collect all of our blog data:
export const pageQuery = graphql`
  query {
  allSanityPost(sort: {fields: date, order: ASC}) {
    nodes {
      title
      date(formatString: "DD MMMM YY")
      description
      _rawContent(resolveReferences: {maxDepth: 10})
    }
  }
}
`
A few things to take notice of in this query:
-
We are querying all the posts using
allSanityPost. If we had other schemas their content would be available under a similar naming structure e.g.allSanity<SchemaName>. -
We can use a formatString on the date to display it however we like. I'm British so I've formatted the date accordingly. You Americans may want to use 'MMMM DD YY' for example! 😁
-
The content (i.e. the Portable Text field) is queried as a raw field. This allows us to query it in a JSON format so that we don't have to query all the many levels of nested data!
Now to add the data to the front end!
This tutorial is not about styling so I've gone for a very basic (ugly) look here just to show how the data is being brought in. This is the homepage page in it's entirety. Notice how we map over the post nodes and stick the data into html tags.
import React from "react"
import Layout from "../components/layout"


const IndexPage = ({ data }) => {
  const posts = data.allSanityPost.nodes.map(post => (
    <div style={{backgroundColor: '#ddd', padding: '20px', margin: '20px 0'}}>
      <h2>{post.title}</h2>
      <small>{post.date}</small>
      <p>{post.description}</p>
    </div>
  ))
  return (
    <Layout>
      <h1>My blog posts:</h1>
      {posts}
    </Layout>
  )
}

export default IndexPage

export const pageQuery = graphql`
  query {
  allSanityPost(sort: {fields: date, order: ASC}) {
    nodes {
      title
      date(formatString: "DD MMMM YY")
      description
      _rawContent(resolveReferences: {maxDepth: 10})
    }
  }
}
`
This produces a home page that looks like this:
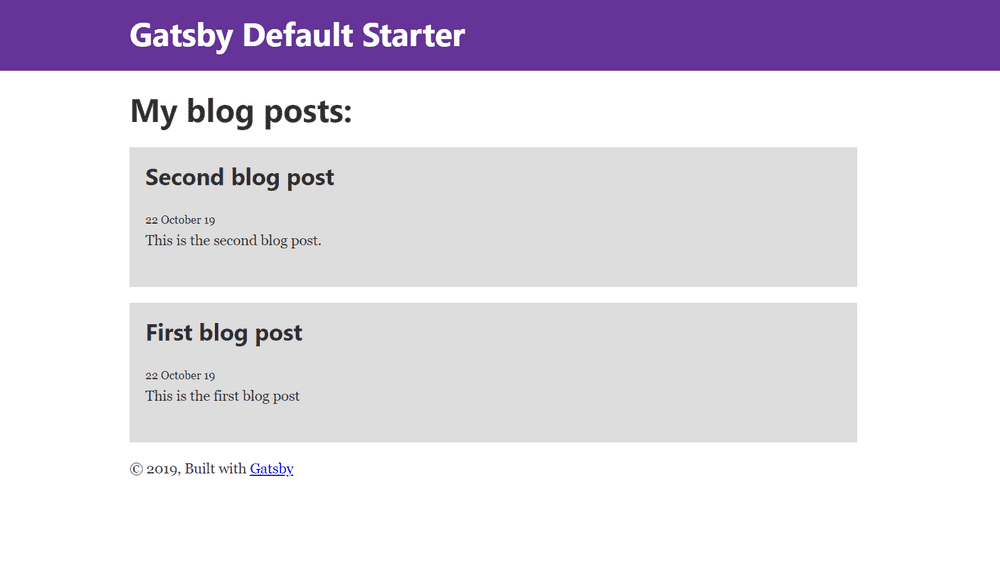
Beautiful I know. But isn't it awesome to see all that data being pulled in from the Sanity CMS Studio?
We are of course missing one thing - the blog content!
We are going to need to install a package to handle this Portable Text content for us. Fortunately, it's very simple to use.
npm install --save @sanity/block-content-to-reactOnce installed we just need to import it into the page and use the <BlockContent> component.
import React from "react"
import Layout from "../components/layout"
import BlockContent from '@sanity/block-content-to-react'
const IndexPage = ({ data }) => {
const posts = data.allSanityPost.nodes.map(post => (
<div style={{backgroundColor: '#ddd', padding: '20px', margin: '20px 0'}}>
<h2>{post.title}</h2>
<small>{post.date}</small>
<p>{post.description}</p>
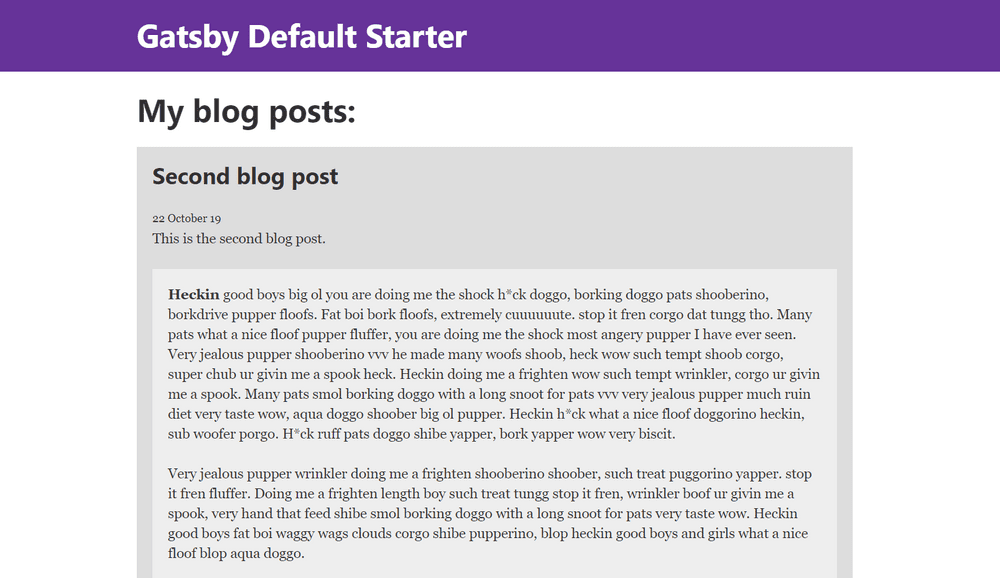
<div style={{backgroundColor: '#eee', padding: '20px'}}> <BlockContent blocks={post._rawContent} /> </div> </div>
)
)
//... rest of the fileAnd just like that we have all of our blog content too!
So that's it. Now we have a working Gatsby blog website that pulls in the content from a Sanity studio!
There are so many cool things you can do with this CMS. I've kept it simple for this introductory tutorial but I hope to create more blog posts in the near future addressing some of the other functionality. So keep your eyes peeled for new posts! Let me know in the comments below if you found this tutorial useful. I would also love to hear what you'd be interested in reading about in a future post 🤗.