May 28, 2019
Creating client accounts for Netlify CMS with Netlify Identity
gatsbynetlifyCMStipstutorialJAMstacknetlifycmsProviding client access to a Netlify CMS admin panel.
If you've created a lovely website with Gatsby and Netlify CMS (maybe following my tutorial) you may now be looking to allow someone else access to the admin panel.
Perhaps you've made a website for a client and need to give them the ability to use the CMS to make content changes. Or you want to allow someone else on your team access.
It is completely possible to allow people access to Netlify CMS without giving them access to your GitHub repository. They will be able to make changes to the repo connected to the site through Netlify CMS but they won't be able to mess with it otherwise.
This tutorial only works if you're hosting with Netlify.
Netlify Identity.
Netlify provides a handy way to make accounts on your website and it's very simple to do this for your Netlify CMS instance. You can use the free-tier in the majority of cases too so you don't have to fork out a penny. Hooray for Netlify.
Depsite it being simple I found it quite tricky to find any step-by-step instructions for doing this and it therefore took me longer than it needed to the first time I tried to implement this. So, here we go!
Setup Netlify Identity.
Find your website on your Netlify account and go to the Identity tab. You will see the following screen:
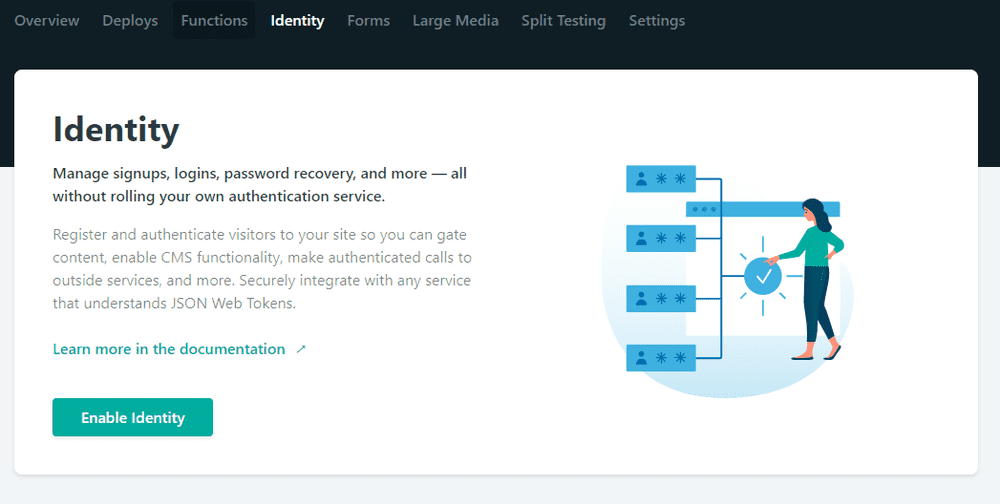
Click Enable Identity.
Now go into Settings and Users and set the Registration Preferences to Invite Only. Then scroll down to Services and select Enable Git Gateway. You may have to login to GitHub for this.
Once you've done this, go back into the Identity tab and click Invite users.
A modal will pop up asking you to enter the email address of the person you're inviting. Pop in your client's email address or whoever it is you want to give access. You should also enter your own address as we will be switching to login through Identity instead of through GitHub.
An email will then be sent to those listed asking you to make an account. Follow these steps (and ask your client to do the same).
Once you and your client have Identity accounts we need to configure Netlify CMS to ask for an Identity login instead of a Github login.
Configuring Netlify CMS to work with Identity.
This is the step I couldn't find anywhere online despite it being the most important!
At the moment when we go to www.ourwebsite.com/admin/ we are faced with the following screen:
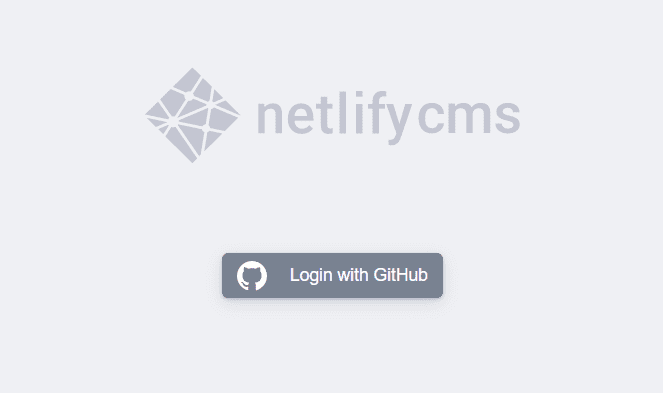
This is no good as it isn't giving us the option to login using Identity, only GitHub.
To fix this we need to go into our static/admin/config.yml file and change the backend details to work with Git Gateway like this:
# In your static/admin/config.yml file

backend:     name: git-gateway    branch: master
media_folder: static/assets
public_folder: assets

collections:
  - label: "Pages"
    name: "pages"
    files:
      - label: "Home Page"
        name: "home"
        file: "content/home.md"
        fields:
          - {label: Title, name: title, widget: string}
          - {label: Intro text, name: intro, widget: text}
          - {label: Image, name: image, widget: image}
Save, commit and push your changes and voila! Next time you go to www.ourwebsite.com/admin/ you will see this screen instead:
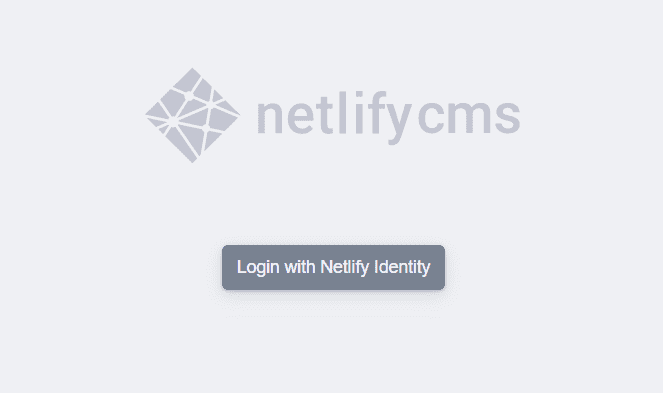
When you click this button you can login with your new details and access the admin panel.
I hope you found this tutorial useful - its a great way of providing clients with access to your Netlify CMS website.