October 27, 2019
Creating singleton pages with Sanity.io
sanitynetlifycmstutorialJAMstackWhat are singleton pages?
Before we start, I should clarify what I mean by 'singleton pages'. If you're creating a blog you will want to make a schema for each blog post. A blog is made up of lots of blog posts so it makes sense that you should be able to create as many blog posts in your CMS as you like. This is the standard behaviour in Sanity.
However, sometimes you may want to create a schema for non-repeatable content. If your blog has an 'About Me' page you may want to create a schema for this so that it is easy to edit. But you don't want to be able to create multiple instances of 'About Me' content in the CMS as it is only needed once. These one-off content schemas are called singletons.
In some content management systems you are able to declare that you are creating a singleton. Netlify CMS for example allows you to create these separately from repeatable content. Sanity does not give you the option to do this at the moment (but it's on their roadmap!). Do not fear, it is still possible to create singleton pages with Sanity - it's just a bit long winded...
What will you need?
For this tutorial I am going to use an existing Sanity project that I created for my Gatsby and Sanity CMS tutorial. I advise having a read through of the tutorial first if you're not familiar with using Sanity as it explains how to set up your schemas and studio.
Creating the schema
First we will create the schema for our 'About Me' page. This is created in almost the exact same way as a repeatable schema. Navigate into your project, into the schemas folder and create a new file called singletonAbout.js. You can name this whatever you like, I personally think its helpful to show that it is a singleton in the name.
// in singletonAbout.js

export default {
    title: 'About Me',
    name: 'about',
    type: 'document',
    fields: [
        {
            title: 'Title',
            name: 'title',
            type: 'string',
            validation: Rule => Rule.required()
        },
        {
            title: 'Description',
            name: 'description',
            type: 'string',
            validation: Rule => Rule.required()
        },
    ]
}
I've gone for a very simple schema allowing the editor to change the page title and the description.
Import this into the schema.js file as you would for any other schema.
// in schema.js

// First, we must import the schema creator
import createSchema from 'part:@sanity/base/schema-creator'

// Then import schema types from any plugins that might expose them
import schemaTypes from 'all:part:@sanity/base/schema-type'
import post from './post'
import singletonAbout from './singletonAbout'
// Then we give our schema to the builder and provide the result to Sanity
export default createSchema({
  // We name our schema
  name: 'default',
  // Then proceed to concatenate our document type
  // to the ones provided by any plugins that are installed
  types: schemaTypes.concat([
    /* Your types here! */
    post,
    singletonAbout  ])
})
Once you have created the schema, deploy it using sanity deploy on the command line.
How do we prevent multiple versions from being created?
If you have a look at your live studio at <your-project>.sanity.studio you will see that 'About Me' has appeared under content in the side bar. But we can create lots of these at the moment and that isn't what we want.
The way we turn this into a singleton is by customising the interface of our studio. We can use the structure builder in Sanity to customise our studio and choose what to display.
To create a custom structure we need to create a file in the root of our project. I'm going to call mine studio-structure.js.
Now go to the sanity.json file in the root and add the following code to the parts array. This tells Sanity where to look for your structure defining file so make sure the path is correct.
// in sanity.json

{
    //... rest of the file
     "parts": [
    {
      "name": "part:@sanity/base/schema",
      "path": "./schemas/schema.js"
    },
    {      "name": "part:@sanity/desk-tool/structure",      "path": "./sanity-structure.js"    }  ]
}
Now restart the local server if you had that running.
Inside the new file we created we export a function that defines the structure of our studio.
So add the following code to your 'sanity-structure.js` file:
// in sanity-structure.js

import S from "@sanity/desk-tool/structure-builder";

export default () =>
  S.list()
    .title("Content")
    .items([
        S.listItem()
            .title("About Me")
            .child(
                S.editor()
                    .id('about')
                    .schemaType("about")
                    .documentId("singleton-about")
            )
    ]);
Okay that looks confusing - let me take you through this step by step.
-
S.list()This says that we want to create a vertical pane. -
.title("Content")Here we give the pane the title of 'Content' just like it has normally. -
.items([])Here we define the items that will appear in this pane. -
S.listItem()Inside the items array we create our first list item. -
.titleWe give the first list item a title of 'About Me'. This is going to be where we define our singleton! -
.child(...)This creates a new child pane when the list item is clicked on. Inside the parentheses we will define what that child pane will contain. -
S.editor()This shows the content editor in the child pane. We specify what this editor displays with the three methods below... -
.id('about')Set this to the name of the singleton. -
.schemaType("about")Here we define which schema this editor will use to generate fields. We want this to use the about schema so it has been filled in accordingly. -
.documentId("singleton-about")This will create a single document with the_idof 'singleton-about' and open it in the editor.
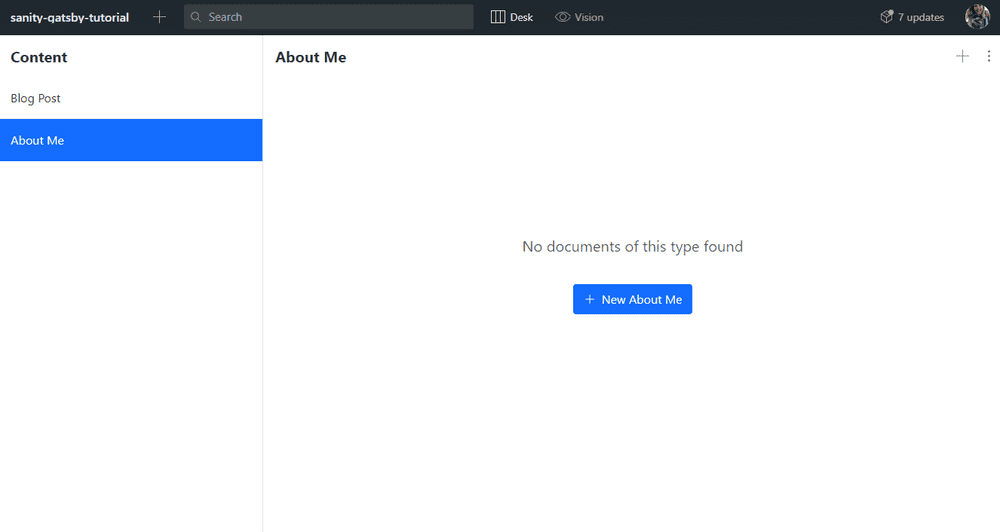
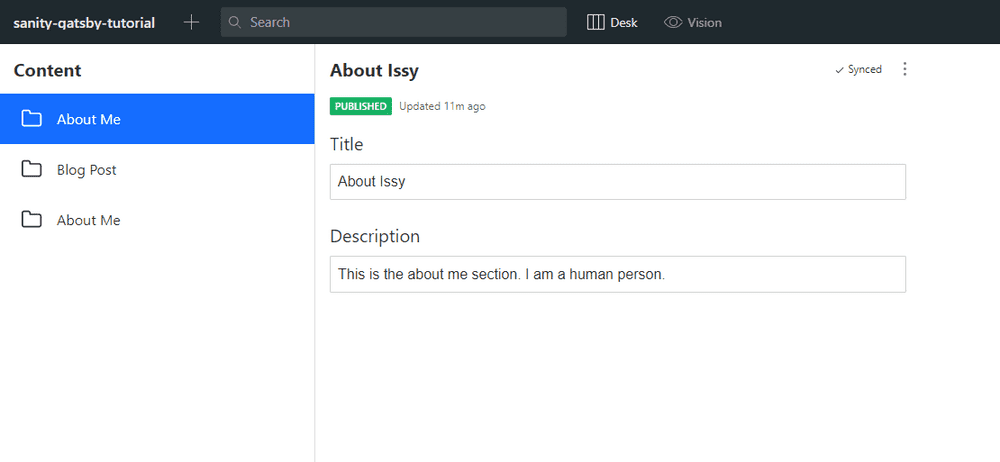
If you run the local server and have a look you will see this single About Me document available to edit. Fill out the fields and click publish!. This all looks good so far, but if you have a click around you will see that the option to delete this document is still available. And if you click the + plus sign at the top you will be given the option to create a new About Me document. This is no good!
To remove these options we need to go back to the singletonAbout.js schema and add the following:
// in singletonAbout.js

export default {
    title: 'About Me',
    name: 'about',
    type: 'document',
     __experimental_actions: [/*'create',*/ 'update', /*'delete',*/ 'publish'],    fields: [
        {
            title: 'Title',
            name: 'title',
            type: 'string',
            validation: Rule => Rule.required()
        },
        {
            title: 'Description',
            name: 'description',
            type: 'string',
            validation: Rule => Rule.required()
        },
    ]
}
Notice how create and delete are commented out? This basically removes the option to create or delete these documents.
Check it out in the studio - you'll find that these two options are no longer available hooray!
Its all looking good - except you may have noticed that we can't see our blog posts (or any other schemas you may have) any more. This is because we have customised the structure by adding a structure builder file. This effectively wipes the studio slate clean and we will need to manually tell the studio that it needs to show the other schemas!
As we don't need to do anything fancy with the blog post schema (it's repeatable content) we can just use the S.documentTypeListItems() method to grab all the schemas and spread them in. Try this..
// in sanity-structure.js

import S from "@sanity/desk-tool/structure-builder";

export default () =>
  S.list()
    .title("Content")
    .items([
        S.listItem()
            .title("About Me")
            .child(
                S.editor()
                    .id('about')
                    .schemaType("about")
                    .documentId("singleton-about")
            ),
        ...S.documentTypeListItems()
    ]);
Have a look at the studio and ... uh oh:
It shows us our custom About Me pane and it shows us the Blog Post pane as we wanted. But it also shows us another About Me pane except this one uses the standard repeatable content structure. Clearly we need to tell Sanity that we don't want it to spread in schemas that we have already customised.
Fortunately we can apply a filter to the S.documentTypeListItems() method that removes any schemas with the id 'about'.
// in sanity-structure.js
import S from "@sanity/desk-tool/structure-builder";
const hiddenDocTypes = listItem => ![ "about" ].includes(listItem.getId())
export default () =>
S.list()
.title("Content")
.items([
S.listItem()
.title("About Me")
.child(
S.editor()
.id('about')
.schemaType("about")
.documentId("singleton-about")
),
...S.documentTypeListItems()
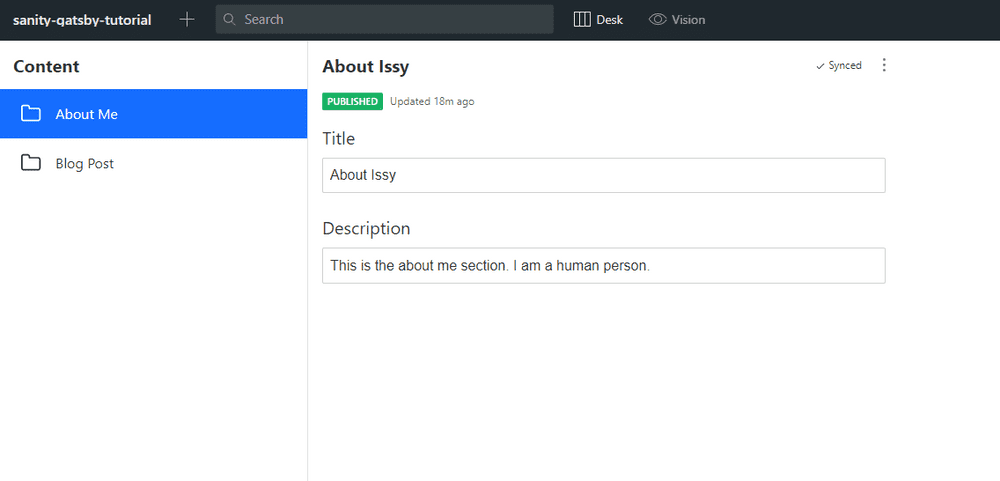
.filter(hiddenDocTypes) ]);Now if we look at the studio we will see exactly what we want!
So that is how you can create a singleton page/schema in Sanity.io. You can create as many as you want of these if you add them as list items in the structure (and remember to add them to the hiddenDocTypes array!).
Don't forget to deploy your changes with sanity deploy!
The code for this tutorial is available on GitHub here. Feel free to clone!
Hopefully Sanity will soon have a built in way of generating singleton pages so that this isn't necessary.